Sleepers are getting more and more common, particularly softwood sleepers for raised beds or steps in the garden. Sleepers are big pieces of wood and can be very daunting for the DIYer. So how do you cut sleepers? Are there any tips and tricks? Let's get into it
How to cut sleepers (Softwood)
When it comes to cutting sleepers there are a few options open to you depending on what equipment you have to use, your budget and also how much effort you are willing to put in.
Your own risk averseness will also play a big part as some of the below options are definitely a lot safer than others.
So what are the options then? Well, to start with, we have the simplest and quite often, the best. A good old-fashioned hand saw. While definitely the most labour intensive of all the options a sharp handsaw gets through a sleeper surprisingly quick.
Then up next is the chainsaw, a common choice, but in the wrong hands a very dangerous tool. And finally, you could use a sliding mitre saw, providing you have one, and that it's big enough!
There are a few other options, such as a circular saw or reciprocating saw, but each has huge downsides. A circular saw will not cut all the way through so you will have to flip the sleeper onto each side, even then you will still probably have to finish it off with a handsaw.
A reciprocating saw will wave around a lot when cutting something this large, you will definitely not end up with a nice straight cut.
Option One - A Hand Saw
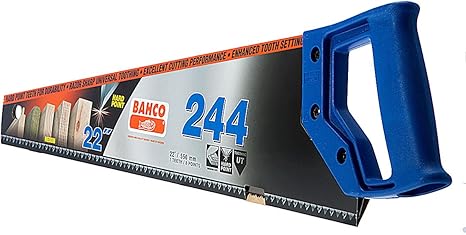
This is a surprisingly good choice, with a few caveats. You need the right saw, and also need to be willing to put in a little elbow grease. But with a good sharp saw, you can fly through a straight cut. I timed myself cutting this sleeper at quite an easy pace and it came out at 1 minute and 10 seconds, not bad at all.
You probably want to get a new saw before attempting this, trust me, you will thank me later. Below is the saw I use myself and indeed the saw I used when cutting this sleeper.
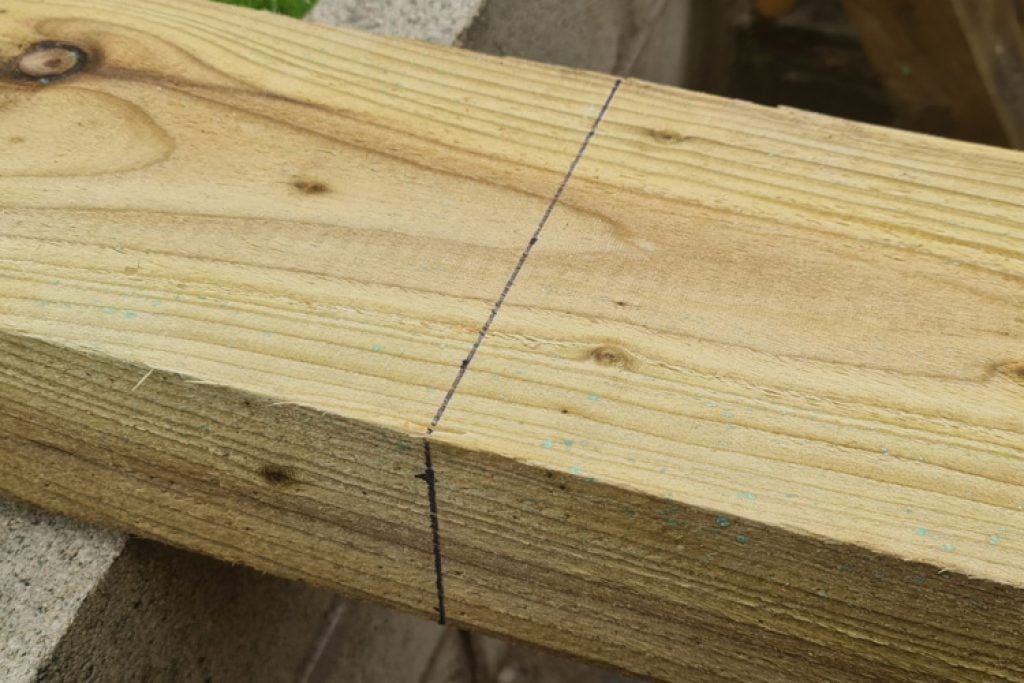
Mark the sleeper with a pencil or marker pen. I like to mark down the side as well as this helps you ensure you remain straight when cutting through and that your saw is not wandering. A square will help you line up the mark down the side.
Step 2 - Line Up The Saw Blade

I like to use my thumb here as a guide to stop the blade from moving when I make my first cuts. Pull back on the saw then lift and start again. You are just making an initial cut here to guide you, no need to go all-in yet!
Step 3- Start Sawing

Now you have started making a mark you can start to make full strokes. Keep the saw at quite a sharp angle and make sure you use the full length of the blade, this massively helps with efficiency.
Step 4 - Keep Going!

There's not much else to say here apart from keep sawing! Also, try and keep your blade at an angle.
Done
So as I said earlier I timed my cut here and it only took 1 minute and 10 seconds. I wasn't pushing overly hard here either so could definitely bring this time down. For a straight cut like this, I wouldn't bother with anything else other than the hand saw.
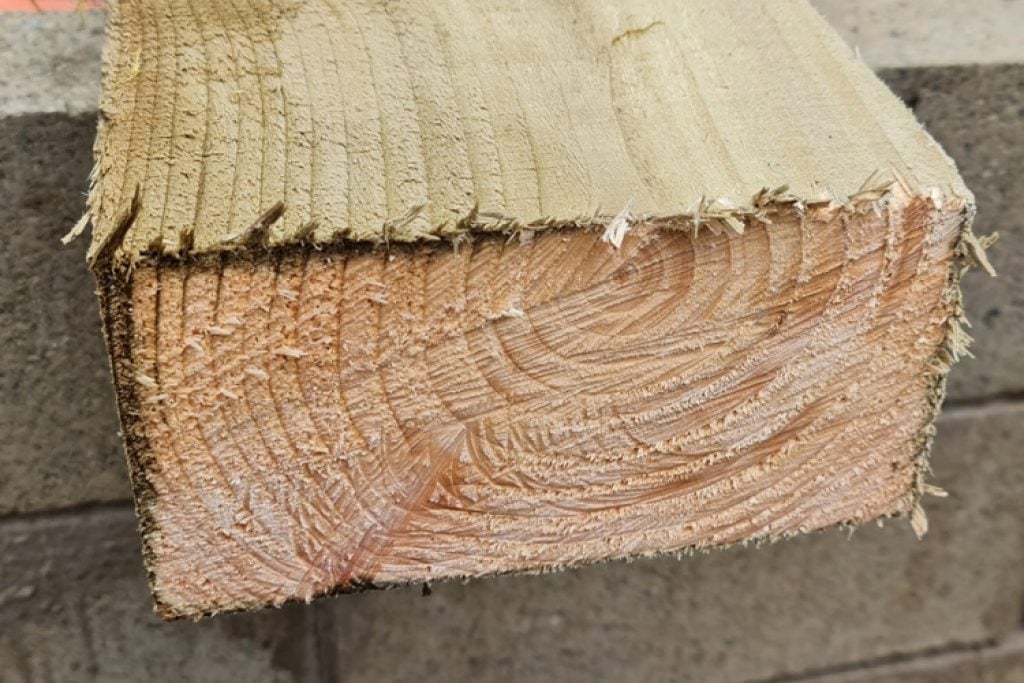
It's cheap, the safest of all the options by a long way and also provides a really good clean cut, as you can see below.

Option 2 - Chainsaw
So here we are, cracking out the big boy toys. A word of warning before we move on, chainsaws are incredibly dangerous and can permanently maim or even kill. If you don't know what you are doing then do not use one.
The one I am using is a small, low-powered, cordless chainsaw, but even this could lop your arm off in an accident.
Step 1 - Mark Your Cut
Like always we start with measuring and marking up our cut. Like all good joiners say, measure twice (or is it thrice?) cut once. And this old adage really does ring true, always take the time to measure and mark your cuts properly and you will save yourself bags of time and headaches down the line.
Step 2 - Line Up And Begin Your Cut

Make sure you have the wood on a solid surface, a good quality sawhorse works really well. Hold the chainsaw firmly and begin sawing at a shallow angle.
Step 3 - Hold The Cut
Keep a firm grip on the chainsaw as it works its way through the wood.

Done!
So that's that done, the chainsaw has made quick work of the sleeper. It made it all the way through in roughly 30 seconds, compare this to the handsaw at 1 minute 10 seconds.
I don't think there is enough of a time difference to warrant the use of the chainsaw and I personally will be sticking to the handsaw and would recommend the same for you too.
Below you can see that the final cut is a lot rougher than what the handsaw achieved. There is also quite a bit of tear-out at the top of the sleeper, which was the bottom of the cut.
Other Options
There are a few other options you have to cut sleepers which I will quickly mention here.
Circular Saw
A circular saw can be used to cut a sleeper, however, it is not the easiest method. Most circular saws, unless you happen to have a huge one, will not cut through a sleeper in one go. So you will need to make a cut then flip the sleeper then cut again, working your way around.
As you probably guessed this ends up taking longer than just going through it with a hand saw. That is one of the main reasons I don't really advise this method.
Sliding Mitre Saw
This is a good option for cutting sleepers but expensive. The sliding mitre saw below is probably the cheapest available and it is still a hefty investment. I myself use a Makita sliding mitre saw and that was a serious investment.
- Multi-material: Premium Japanese tungsten carbide tipped (TCT) blade included cuts steel, aluminium, wood with embedded nails, plastic and more
- Powerful: 1200 W optimised gearbox and blade system, increases motor and blade life to cut through a variety of materials with ease
- Accurate: Precision cutting with laser guidance, trench cut facility, 0 - 45 Degree bevel and 50 - 50 Degree mitre settings, covers all common cutting angles
- 3 year warranty (only valid if purchased in the UK)
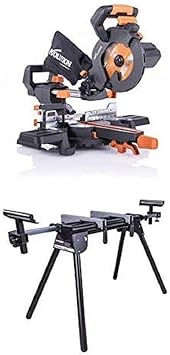
You really need a sliding mitre saw here to give you the extra cutting distance to be able to go through a full sleeper in one cut.
Reciprocating Saw
Some people have told me about this method but it is not one I have used myself. A reciprocating saw will tend to bend and wobble over a cut this large leading to imperfect cuts, something I really don't like!


Pete says
Hi Daniel, I have a circular saw and was considering using this, however after reading your article I will now stick to the hand saw.
Thanks.
Shaun says
Thanks for this. I was considering a pretty expensive battery driven mitre saw but even then I'm not sure it would get through a 100x200 sleeper, so I'll go for the handsaw and workout!