
The old, reliable Christmas companion looked finished.
A few limp green chains, dust caught in the joints, one lonely stem hanging over the pot like it was desperately trying to escape its inevitable end.
Eight months later, I had ten Christmas cactus plants. Real ones. Rooted, branching, sturdy enough to give away without feeling sheepish. What you would call flourishing.
All through the power of taking cuttings and doing it the right way.
How one plant turns into ten
A mature Christmas cactus is packed with future plants.
Look closely. The “leaves” people talk about are flattened stem segments called phylloclades. They grow in chains, joint by joint, and each joint is already a natural break point.
That’s why this plant multiplies so easily. You’re cloning the parent from stem pieces rather than starting from seed. Research on Schlumbergera truncata has shown that shoot and phylloclade segments can regenerate new plant tissue, which matches what home growers have done forever: snap off a healthy piece, root it, and grow a copy of the plant (PMC).
The math is simple enough. If your plant has 40 usable segments, and each cutting has 3 to 4 segments, you can get about 10 starts without turning the parent into a skeleton.
A cutting with 3 or 4 segments has enough stored energy to stay alive while roots form. (You can root just one segment and it does work, but they tend to take a lot longer to establish themselves) It also has enough green surface to keep photosynthesizing.
| Parent plant size | Usable segments | Best cutting size | Realistic new plants |
|---|---|---|---|
| Small young plant | 12 to 20 | 3 to 4 segments | 2 to 4 |
| Medium plant | 25 to 40 | 3 to 4 segments | 6 to 10 |
| Mature plant | 40 to 60+ | 3 to 4 segments | 10+ |
“Usable” matters here. Skip weak, shriveled, flowering, or damaged pieces. Firm green stems from healthy growth are the ones worth taking.
This kind of pruning doesn’t ruin the mother plant when you do it cleanly. It usually makes the plant fuller later because you remove long floppy chains and the plant branches from lower joints. The parent gets tidier, and the cuttings become new plants.
First, though, check which holiday cactus you actually have. Garden center labels play pretty loose with the names.
Check which holiday cactus you have
Most “Christmas cactus” plants sold in the United States are actually Thanksgiving cactus. Annoying, yes. A problem for propagation, no.
Both are Schlumbergera. Both root from stem cuttings. The method stays the same: take a few segments at the joint, let the wound callous, then root the cutting in a loose medium.
It still helps to know what’s in your pot.
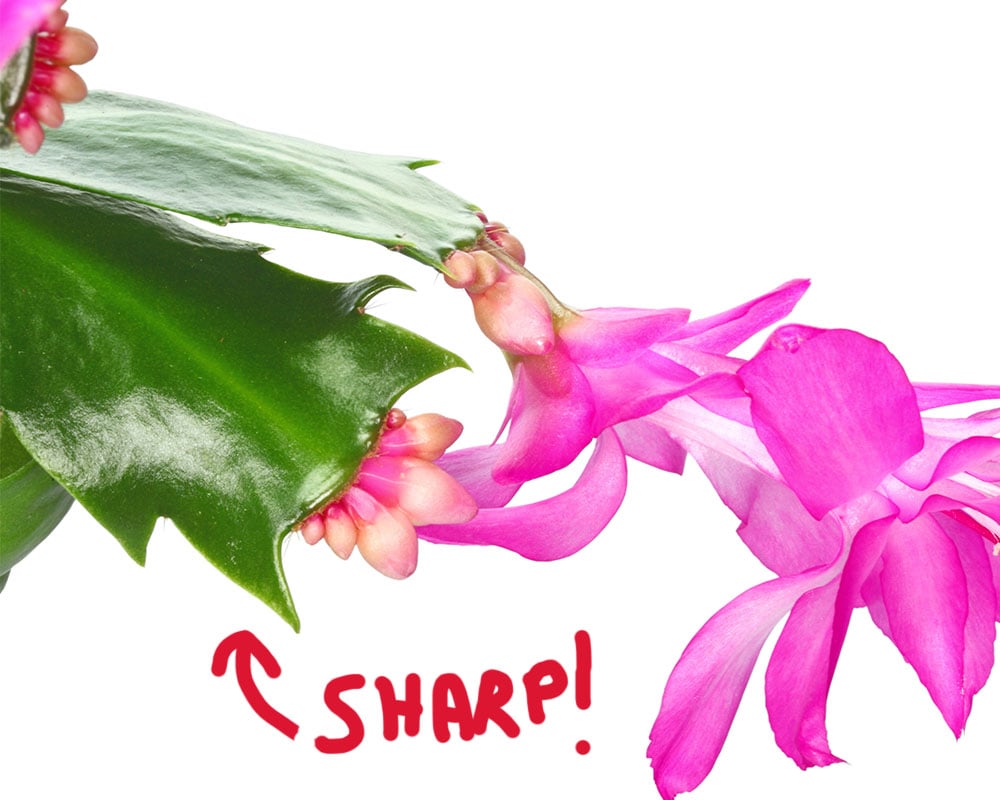
A Thanksgiving cactus, usually Schlumbergera truncata, has pointed teeth along the edges of each segment. People often compare the segments to little crab claws.
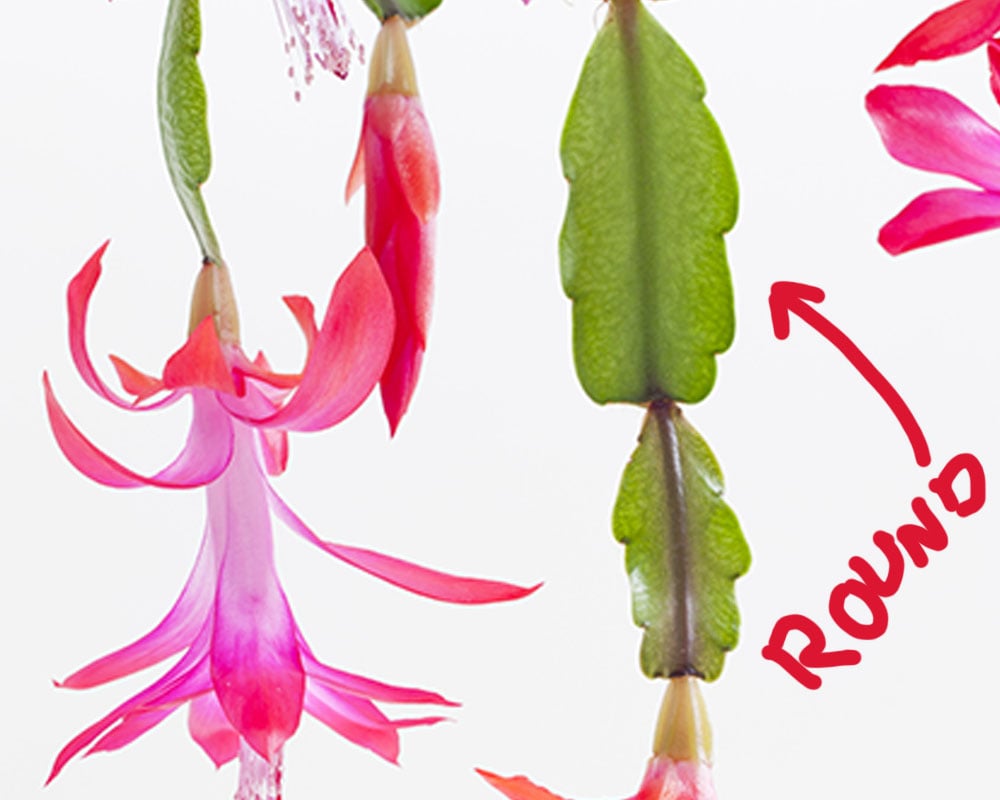
A true Christmas cactus, often Schlumbergera x buckleyi, has softer rounded lobes and usually drapes more.
| Feature | Thanksgiving cactus | Christmas cactus |
|---|---|---|
| Segment edges | Pointed teeth | Rounded lobes |
| Common store label | “Holiday cactus” or “Christmas cactus” | Less common in big-box stores |
| Growth habit | More upright at first | More arching and draping |
| Propagation method | Same | Same |
If you bought a “Christmas cactus” in November and it bloomed before Thanksgiving, you probably have a Thanksgiving cactus. Root it anyway.
Timing matters more than the name. You can propagate these plants at different times of year, though the strongest window is usually after blooming, when the plant shifts back into vegetative growth.
Late spring is my favorite time for the big ten-from-one chop. The plant has finished flowering, rested a bit, and is ready to push green growth instead of spending energy on blooms.
What a good cutting looks like
A good cutting starts at the joint, that narrow connection between two flattened segments. Don’t cut halfway through a segment just because the scissors landed there.
That joint is the node, and it’s the natural place to separate the stem.
For this ten-plant method, I like cuttings with 3 or 4 segments. Two can work. Five can work. The broader accepted range is 2 to 5 flattened segments. Still, 3 to 4 is the easiest size to handle.
A single segment has less stored water, less green tissue, and less room for error. In a dry house, or when the parent plant was already stressed, single segments wrinkle before they root. A big 6-segment cutting creates the opposite headache. It gets top-heavy, falls over, and tempts you to bury it too deep, which invites rot.
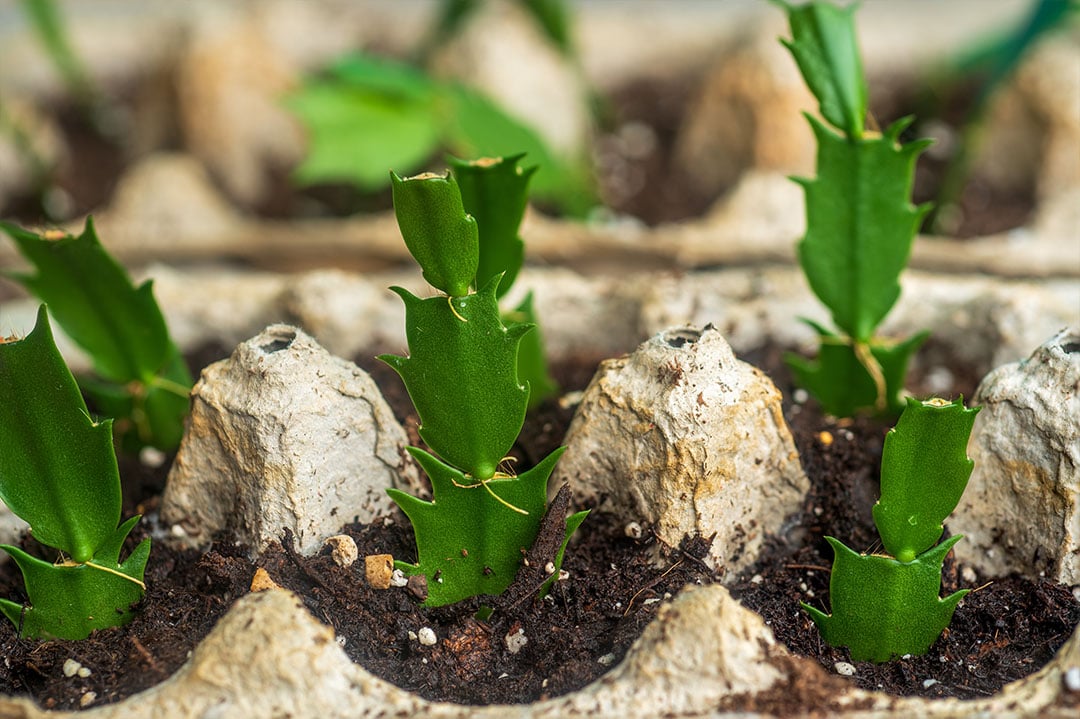
Look for cuttings with:
- 3 to 4 firm green segments
- Non-flowering stems
- Clean separation at the joint
- No mushy spots
- No shriveled, papery sections
- No flower buds left attached
If a piece breaks off with buds, pinch them off. I hate doing it too, especially when the buds are fat and pink, but a rootless cutting has no business trying to bloom. Flowers drain energy that should go into root formation.
To remove the cutting, hold the lower stem steady with one hand and gently twist the piece off at the joint with the other. It should pop free. If it tears, the angle was off or the tissue was too soft.
If you use a knife or scissors, make sure the blade is sharp and clean. Wipe it with rubbing alcohol first. Crushed tissue causes trouble because rot loves bruised, wet plant tissue.
Rot is the main thing you’re trying to avoid.
Let the cut end dry for 48 hours
A fresh Christmas cactus cutting shouldn’t go straight into wet potting mix. That’s how people accidentally make compost.
The cutting has an open wound. It’s moist, full of plant sugars, and very attractive to soil fungi and bacteria.
The fix is almost embarrassingly simple. Lay the cuttings on a dry paper towel for 24 to 48 hours. No water, no misting, no sunny windowsill, no plastic bag. Let the broken end dry.
This drying period is called callousing. The plant forms a thin dry seal over the wound, which lowers the risk of rot after planting.
Beginners get nervous here because the cutting is just sitting out on the counter. A healthy 3-segment cutting can handle two dry days. Remember, these are succulent stems, and they store moisture.
Put the cuttings somewhere:
- Shaded
- Dry
- Room temperature
- Away from heater vents
- Away from direct sun
- Away from curious cats, kids, and anyone who “tidies up”
After 24 to 48 hours, check the base. It should feel dry to the touch, slightly sealed, and free of wet gloss or mush. If the end still looks fresh and juicy, wait another day.
I skipped this step the first time I propagated holiday cactus. I planted fresh pieces into damp soil, felt absurdly pleased with myself, and watched several bases turn brown within two weeks. The shortcut cost me more time than it saved.
Water rooting looks fun, soil rooting wins for ten plants
Water propagation photographs beautifully. Soil propagation gives you stronger odds when the goal is ten plants that survive.
You can root Christmas cactus cuttings in water. Plenty of gardeners do. Flower Patch Farmhouse teaches a beginner-friendly water method for Christmas and Thanksgiving cactus cuttings (Flower Patch Farmhouse). There are also DIY setups where people stretch foil over a bowl or jar, poke slits in it, and suspend cactus pieces so the base barely touches water.
I understand the appeal. You see the roots forming, and that first white nub feels like proof you’ve pulled off a small magic trick.
The downside shows up later. Roots grown in water are tender and adapted to that watery environment. When you move them into potting mix, they often struggle.
Professional propagation guidance favors well-drained media like perlite, coarse sand, or peat-perlite blends because the roots form where they’ll keep growing. Iowa State extension-style guidance, summarized in the academic brief, recommends 2 to 5 flattened stem segments, an overnight callous, then rooting in perlite or coarse sand, with roots commonly forming in about 6 to 8 weeks (PMC).
For one cute cutting on a windowsill, water is fine. For turning one plant into ten, use a rooting medium. You skip the awkward transition from water roots to soil roots, and you end up with plants you can pot up, grow on, and hand to someone in December without adding a nervous little apology.
If you still want to try water propagation, keep it tight:
- Let the cutting callous first.
- Let only the bottom tip touch the water.
- Do not submerge a whole segment.
- Change the water regularly.
- Move it into potting mix when roots are short, before they become a tangled white beard.
For ten sturdy starts, I’d skip the jar show and mix the right medium.
Make the rooting mix airy
Christmas cactus is a cactus with rainforest habits, which explains a lot of the bad advice floating around.
Schlumbergera species are epiphytic or lithophytic succulents. In plain English, they naturally grow on trees or rocks rather than in hot desert sand. Their roots want air, light moisture, and fast drainage.
Heavy garden soil is a bad choice. I’m also lukewarm on dense bagged cactus mix for this job. A lot of commercial cactus mixes are built for desert plants, and once they settle, they can become too sandy, too fine, or too dry.
For rooting holiday cactus cuttings, I want high porosity.
| Ingredient | Amount | Job |
|---|---|---|
| Peat moss or coco coir | 60% | Holds light moisture |
| Perlite or coarse sand | 40% | Creates air pockets and drainage |
That 60/40 blend stays lightly moist without turning into soup.
Perlite is my favorite for home propagation because it’s clean, light, and easy to find. Coarse sand can work too. Avoid fine play sand because it packs down and wrecks the drainage you were trying to create.
The medium should be slightly acidic. The briefed professional range is pH 5.5 to 6.2, which matches the preference of these epiphytic cacti for acidic, airy substrates.
Do you need to test pH for ten cuttings? Probably not. If you’re using odd old potting mix from the garage, or your rooted plants keep yellowing, pH is worth checking.
I wouldn’t use:
- Outdoor garden soil
- Heavy moisture-control potting mix
- Old sour-smelling soil
- Fine beach sand
- A pot with no drainage hole
- Dense decorative moss packed around the base
Fresh mix matters. It doesn’t need to be lab sterile, just clean. If the bag smells rotten, sour, or swampy, don’t use it for propagation. Starting cuttings in questionable mix is like sending toddlers to daycare during flu season.
Before planting, moisten the medium until it feels like a wrung-out sponge. If you squeeze a handful, it should clump lightly and maybe release a drop or two. It shouldn’t drip between your fingers.
That moisture balance is the whole game. Too dry and the cutting stalls. Too wet and the base rots.
Plant the cuttings shallow
The cutting doesn’t need to be buried like a fence post. It only needs contact with the medium.
Insert the calloused end about 0.5 to 1 cm deep into the rooting mix. That’s roughly a quarter inch, give or take. It feels too shallow the first time, and you’ll want to push it deeper. Resist that urge.
Burying a full segment creates a big wet contact area against soft green tissue. That raises the chance of rot. The node only needs enough contact with the medium for roots to form and anchor.
Here’s my planting routine:
- Fill ten small nursery pots with pre-moistened 60/40 mix.
- Tap the pots gently to settle the mix.
- Make a small hole with a pencil, chopstick, or plant label.
- Insert the calloused end 0.5 to 1 cm deep.
- Firm the mix gently around the base.
- Label each pot with the date.
I like 2-inch nursery pots because they dry evenly and don’t hold a soggy reservoir around a rootless cutting.
Planting ten cuttings together in one big pot can work, but failures are harder to manage. One rotting cutting can sit beside nine healthy ones, and suddenly you’ve made a little disease neighborhood. Individual pots are cleaner.
If a cutting tips over, don’t bury it deeper. Prop it with small pebbles, a toothpick, or a chopstick. Gardeners on Reddit mention using moist soil or water, with small pebbles or support to keep cuttings upright (Reddit).
The support is temporary. Once roots form, the plant will hold itself.
Go easy when firming the mix around the base. Roots need oxygen, and a compacted pot works against you. Press just enough so the cutting doesn’t wobble.
Give them bright light and steady warmth
Fresh cuttings are plant pieces trying to become houseplants. They have no roots yet, so they can’t replace water quickly. Keep stress low.
Light should be bright and indirect. Skip hot afternoon sun, a bare south-facing windowsill in July, and the classic “I’ll put them outside for better light” experiment unless crispy cactus chips sound appealing.
An east-facing window is great. A bright north-facing window can work. A south or west window needs a sheer curtain or some distance from the glass.
Direct sun can turn the segments reddish or purple. That color is a stress signal, so move them back if you see it.
Temperature matters just as much. The ideal rooting temperature is 70°F to 75°F. That’s warm enough to encourage root growth without cooking the cuttings. Below 65°F, rooting slows and failures become more likely. The briefed professional data suggests success drops when ambient room temperatures stay below that mark.
Watch out for:
- Cold windowsills at night
- Drafty entryways
- Heat vents
- Air-conditioning blasts
- Unheated porches
- Sunny glass that swings from cold to hot
If your house runs cool, a seedling heat mat on low can help. Put the tray on the mat rather than on a radiator. The goal is steady warmth at the root zone, with the stems staying comfortable.
A normal 70°F room with bright indirect light is enough. Consistency does more than perfection here. Cuttings stall when they get warm Monday, cold Tuesday, soaked Wednesday, and bone-dry Thursday.
Once light and temperature are set, the next temptation is misting. I’d leave the spray bottle alone.
Raise humidity without wetting the stems
Christmas cactus cuttings like humid air. They hate sitting wet.
That makes sense when you remember where these plants come from. They’re rainforest succulents, so they grow where the air is humid while the roots still get oxygen.
Aim for about 50% relative humidity if you can.
If your home is dry, especially in winter with forced-air heat, a simple humidity tent helps. Place a clear plastic bag over the pots or use a clear storage container as a mini greenhouse.
Build it with airflow in mind. The plastic shouldn’t touch the segments because condensation sitting against the plant can lead to spots, mold, and rot. Use chopsticks, skewers, or plant labels to hold the plastic up.
Vent it every couple of days. Open the bag or lift the lid for an hour. If water is dripping down the plastic, the inside is too wet, so vent longer.
I don’t mist Christmas cactus cuttings. Misting feels caring, but droplets sitting on phylloclades cause problems. The professional guidance in the brief warns that direct surface wetness can contribute to fungal or bacterial issues, which fits what I’ve seen in trays.
Humidity around the plant is helpful. Water sitting on the plant is trouble.
You can also raise humidity by grouping pots together on a tray. Just don’t leave the pots sitting in standing water. Think damp air, airy mix, and dry plant surfaces.
Expect roots in 3 to 12 weeks
For a while, nothing seems to happen. That’s normal.
Christmas cactus cuttings usually root somewhere in the 3 to 12 week range. Under good conditions, 6 to 8 weeks is common, which matches extension-style guidance summarized in the academic source (PMC).
The first two weeks can look especially boring. The cuttings sit there, and you’ll want to tug them to check. Don’t. New roots are tiny and fragile. Pulling the cutting up can snap root hairs and set the plant back.
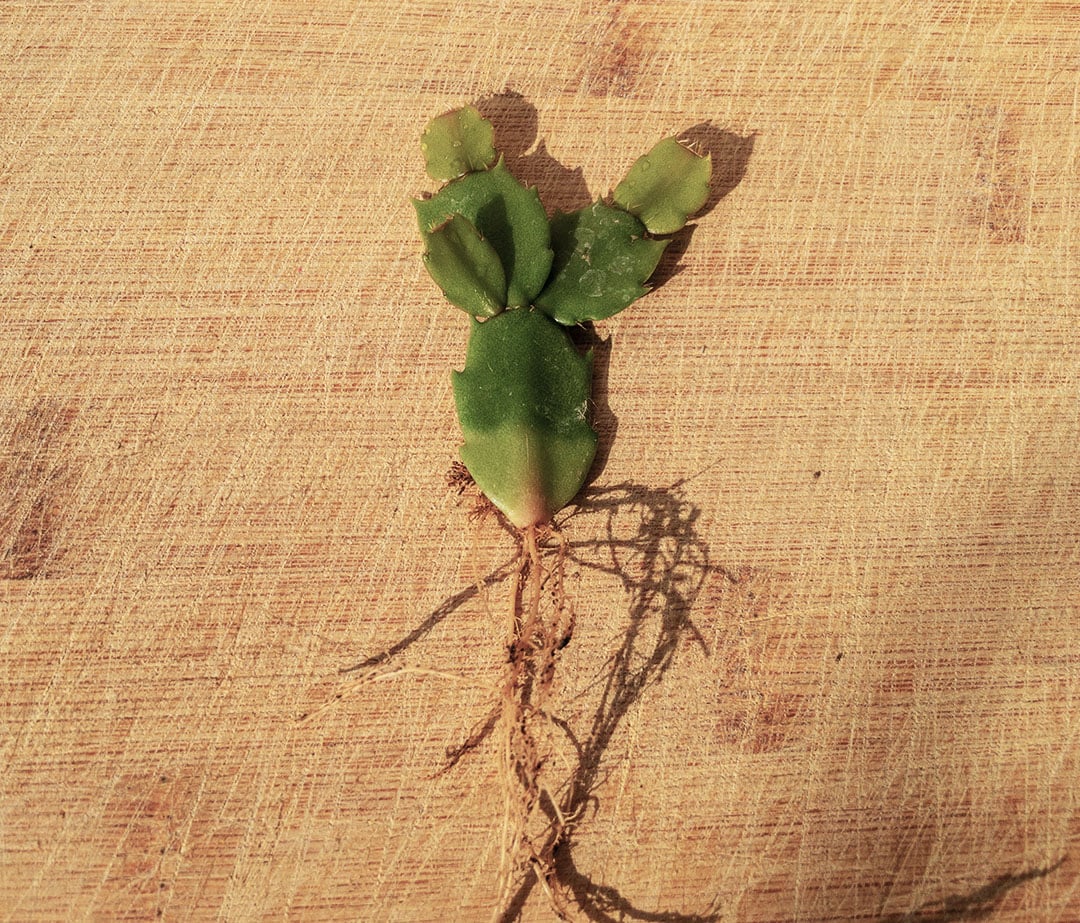
Watch for better signs:
- The segment stays firm.
- The color stays healthy green.
- The cutting does not lean more each day.
- The base stays dry and solid.
- Tiny new growth appears at the tip.
New tip growth is the best sign because it means the roots are doing enough work to support new stem tissue.
Watering during this stretch is where people cause most of their own problems. The medium should stay slightly moist, never saturated. I check by touching the top of the mix and lifting the pot. A very light pot usually needs a little water. A cool, heavy pot can wait.
For tiny pots, I water around the edge instead of dumping water onto the cutting base.
Bottom watering can work too. Set the pots in a shallow tray of water for a few minutes, then remove them and let them drain. Don’t let them soak for an hour while you answer emails and forget they exist.
If the base turns translucent, brown, or mushy, you’re dealing with rot.
- Remove the cutting.
- Cut back to firm green tissue.
- Let it callous again for 24 to 48 hours.
- Replant in fresh, barely moist medium.
Sometimes the top two segments can be saved. Sometimes they can’t.
That’s why I start with ten or twelve cuttings when I want ten finished plants. A small buffer keeps one failure from wrecking the count.
Advice that causes more trouble than it solves
Some Christmas cactus advice gets repeated because it sounds tidy. A lot of it falls apart in the pot.
Christmas cactus doesn’t want desert treatment
It’s a cactus, but it grows as an epiphytic rainforest succulent rather than a barrel cactus baking in Arizona gravel.
Airy organic material beats dense sand. Use a loose peat-perlite or coir-perlite blend, keep it lightly moist, and give the plant humidity plus drainage.
Water propagation is easier to watch
Water propagation lets you see the roots, which is fun.
If you’re making one experimental cutting, go ahead. Use a jar and enjoy the little roots forming.
For ten plants that transition smoothly into pots, root them in medium from the start. Water-grown roots can struggle after transplanting, and the brief notes up to a 30% failure rate when those cuttings move into soil. Treat that as a warning label.
Bigger cuttings aren’t always faster
Sometimes a huge cutting works. More often, it flops over and rots where you buried the base.
A 3 or 4 segment cutting is easier to callous, easier to plant, easier to keep upright, and less likely to collapse before rooting. Start modest and build fullness later.
Extra water slows the whole thing down
This one kills plants. Roots need oxygen, and saturated media squeeze out air. Then the base sits wet, pathogens move in, and the cutting melts.
Slightly moist is the target. Dry as dust stalls the cutting. Swampy mix rots it.
Rooting hormone is optional
Christmas cactus roots readily without rooting hormone. Some growers may use IBA auxin products for consistency, but the general home-gardener method doesn’t depend on hormone.
Good cuttings, callousing, warmth, and airy medium matter more.
Flower buds should come off
Pinch buds off cuttings. A rooted mature plant can bloom. A rootless cutting needs to survive first, and flowers pull energy away from root formation.
Once you stop chasing the myths, the process gets calmer. The next step is turning rooted cuttings into plants that look full instead of stringy.
Pinch the tips to make fuller plants
A rooted cutting isn’t automatically pretty. Sometimes it grows one long chain and keeps going, technically alive but awkward on a gift table.
Pinching fixes that.
About three months after rooting, once the plant is actively growing, remove the terminal segment from each main branch. Twist off the last segment at the joint.
It feels wrong the first time. You waited months for new growth, and now you’re removing some of it. Do it anyway.
Pinching changes the growth pattern. When you remove the tip, the plant is pushed to branch from lower nodes. Instead of one long strand, you often get two new shoots. That’s how density builds.
Commercial holiday cactus plants look full because growers pinch and shape them while they’re young.
| Stage | What to do |
|---|---|
| Fresh cutting | Do not pinch |
| Rooting phase | Leave it alone |
| About 3 months after rooting | Pinch the terminal segment |
| New side shoots appear | Let them grow |
| Plant gets leggy again | Pinch lightly after active growth resumes |
The removed tips aren’t waste. You can callous them and root them too.
This is where the one-into-ten project becomes mildly dangerous, in the good way. Ten plants become twenty if you keep saving pinched segments. Ask me how I know.
For gift plants, I like each pot to have multiple branches before it moves into a nicer container. A single upright cutting in a decorative pot looks like a science project. A pinched, branching start looks intentional.
Fullness takes time. You build it.
Wait before feeding
Fresh cuttings don’t need fertilizer. They lack the roots to use it.
For the first stretch, they live off stored energy in their segments. Fertilizer in the pot too early can burn tender new roots or leave salts in a small container.
Wait until the plant is clearly rooted and pushing new growth. A safe rule is around month four.
At that point, if the cutting has new segments and feels anchored, begin feeding lightly during active growth. Use a balanced water-soluble fertilizer at half strength. A 10-10-10 or similar balanced formula is fine, and the brand doesn’t deserve much drama.
Feed about once a month in spring and summer while the plant is growing. Stop or reduce feeding as fall and winter approach, especially if you want buds later.
Too much fertilizer gives weak, floppy growth and makes a young plant more annoying to manage in a tiny pot.
Young Christmas cactus plants want moderation:
- Moderate light
- Moderate moisture
- Moderate feeding
- Moderate warmth
They aren’t heavy feeders when they’re babies.
If the plant looks pale, check light and moisture before blaming nutrients. Overwatered roots can cause yellowing too, and adding fertilizer to a struggling root system is like handing coffee to someone with food poisoning.
A simple timeline to follow
If you want ten new plants, treat it like a small project. It’s simple, but it goes better when you keep track.
| Time | Task |
|---|---|
| Day 0 | Choose healthy, non-flowering stems |
| Day 0 | Twist off 3 to 4 segment cuttings at the joint |
| Day 0 to 2 | Lay cuttings on dry paper towel to callous |
| Day 2 | Mix 60% peat/coir with 40% perlite/coarse sand |
| Day 2 | Moisten mix until it feels like a wrung-out sponge |
| Day 2 | Plant cuttings 0.5 to 1 cm deep |
| Weeks 1 to 3 | Keep warm, bright, and lightly moist |
| Weeks 3 to 12 | Watch for roots and new growth |
| Around month 3 after rooting | Pinch tips to force branching |
| Around month 4 | Start half-strength monthly feeding if growth is strong |
Label the pots. Seriously. You think you’ll remember the date, and you won’t.
Write the cutting date on a plant label or a piece of painter’s tape. If you’re testing water against soil, label that too. Your future self deserves data instead of vibes.
I also like to write down the room temperature for the first week. If one batch roots fast and another sits for twelve weeks, the answer is usually light, temperature, or moisture.
Keep the notes simple:
- Date cut
- Date planted
- Medium used
- Water or soil
- First sign of growth
- Failures and likely cause
That’s enough.
What you’ll need
You don’t need a greenhouse bench or a misting system. For ten plants, you need clean materials and small containers.
Here’s what I use:
- One healthy parent Christmas or Thanksgiving cactus
- Ten 2-inch nursery pots with drainage holes
- Peat moss or coco coir
- Perlite or coarse sand
- Paper towels
- Plant labels
- Permanent marker
- Rubbing alcohol
- Sharp blade or scissors, if you don’t twist by hand
- Chopsticks, toothpicks, or skewers for support
- Clear plastic bag or container for humidity, if your room is dry
- Optional seedling heat mat
- Optional pH strips
If you already garden indoors, you probably have most of this in a bin somewhere.
The one thing I wouldn’t skip is drainage holes. Decorative cachepots are fine later. Rootless cuttings need drainage now. A cute ceramic pot with no hole is a rot trap wearing a nice outfit.
For the first few months, ugly nursery pots win. You can dress the plants up after the roots are real.
What happened in my batches
My first batch was a little embarrassing.
I took a handful of cuttings, planted them right away, and used whatever tired potting soil was sitting in an old bag near the garage door. No callous. Too much moisture. Too much confidence.
Several cuttings rotted at the base within two weeks. The survivors were mostly thicker 3-segment pieces. The single segments either stalled or shriveled.
That batch taught me three things fast:
- Fresh wounds hate wet mix.
- Old heavy soil is not a rooting medium.
- Bigger is not always better, but single segments are not ideal either.
The second batch went better.
I took only firm, non-flowering pieces. Most had 3 or 4 segments. I let them sit on paper towel for 48 hours. Then I planted them shallowly in a peat-perlite mix and kept them in bright indirect light around normal room temperature.
That tray rooted much more evenly.
The third batch gave me the clean ten. I started with more than ten cuttings because I wanted a buffer, used individual 2-inch pots, labeled the date, and left them alone instead of tugging every few days like an impatient raccoon. After rooting, I pinched the tips and let the new branches develop.
By late fall, they looked like actual little plants. They weren’t huge or nursery-perfect, but they were full enough to give away without saying, “It’ll look better later, I promise.”
Ten solid starts beat thirty struggling sticks every time.
The rules worth remembering
If you keep only a few details in your head, make them these:
- Take cuttings at the joint or node.
- Use healthy, non-flowering pieces with 2 to 5 segments.
- Aim for 3 to 4 segments if you want the easiest size.
- Let cuttings callous for 24 to 48 hours before planting.
- Root in perlite, coarse sand, or a peat-perlite style blend.
- Plant shallowly, about 0.5 to 1 cm deep.
- Keep light bright but indirect.
- Keep temperature around 70°F to 75°F.
- Keep the medium slightly moist, never saturated.
- Pinch after about three months of growth to build fullness.
The method is plain and effective. After you’ve done it once, every long Christmas cactus stem starts looking like a future plant.
Common troubleshooting questions
Why is my Christmas cactus cutting shriveling?
Shriveling usually means the cutting is losing water faster than it can replace it.
That can happen when the parent plant was dehydrated, the room is too dry, the cutting sat in direct sun, or humidity is very low.
If the cutting is still somewhat firm, move it to bright indirect light, add a loose humidity tent, and make sure the medium is lightly moist. Soaking it won’t save a rootless cutting. Soggy soil usually adds rot to the original problem.
My cutting turned mushy at the base. What happened?
That’s rot.
The usual causes are planting before the base calloused, burying the cutting too deeply, or keeping the medium too wet.
Pull the cutting out. Cut away mushy tissue until you reach firm green tissue. Let the new wound dry for 24 to 48 hours, then replant in fresh medium.
If rot has moved through most of the cutting, toss it. Losing one cutting is better than risking the whole tray.
Can I propagate Christmas cactus in water?
Yes.
Water propagation works, and many home gardeners like it because they can watch roots form. Flower Patch Farmhouse shows water rooting as a simple method for Christmas and Thanksgiving cactus cuttings (Flower Patch Farmhouse).
For ten plants, I prefer rooting directly in a well-drained medium. Water roots can struggle when moved to soil, and professional guidance favors perlite, coarse sand, or peat-perlite blends for reliable propagation.
If you use water, let the cutting callous first and keep only the very bottom touching water.
Can I use rooting hormone?
You can, though you don’t need it.
Schlumbergera cuttings root readily when the basics are right: healthy cutting, calloused base, airy medium, warmth, and indirect light.
Some propagation systems use auxins such as IBA to improve consistency, but there is no strong home-gardener need for rooting hormone here.
If you already have it, use it lightly according to the label. If you don’t, skip it.
How long does it take Christmas cactus cuttings to root?
Expect 3 to 12 weeks.
In good conditions, 6 to 8 weeks is common. Iowa State-style guidance summarized in the research brief points to roots forming in about that 6 to 8 week range when cuttings are rooted in perlite or coarse sand after callousing (PMC).
Cool rooms slow everything down. So does low light.
If nothing has happened after 12 weeks but the cutting is still firm and green, it may just be slow. Check warmth, moisture, and light before giving up.
When can I move rooted cuttings into decorative pots?
Wait until the plant is anchored and growing.
Signs it’s ready:
- New segments are forming.
- The cutting resists a very gentle nudge.
- Roots are visible near drainage holes.
- The plant dries its small pot at a normal pace.
Move up only one pot size. A tiny rooted cutting in a giant decorative pot sits in too much wet soil, which can rot young roots.
Use the pretty pot as a cover pot if you want the look.
Why are my segments turning reddish purple?
That usually means too much light.
Move the plant out of direct sun and into bright indirect light. An east-facing window is often better than a hot south-facing one.
Some color stress can fade once the plant is moved. If the tissue is scorched, the marks may stay, but new growth should look better.
When will my new Christmas cactus bloom?
Most new cuttings need time to mature before they put on a strong bloom show.
Think in seasons, not weeks.
Once the plants are established, flowering is triggered by seasonal cues: longer nights and cooler temperatures. Many growers encourage bud set by giving plants long uninterrupted dark periods and cooler nights in fall.
Don’t rush young cuttings. Roots come first, then branches, then flowers.
The whole ten-plant plan
Pick a healthy parent plant after blooming, ideally in late spring.
Count the usable segments. You want enough 3 to 4 segment pieces to make at least ten cuttings, plus a couple extras if the parent can spare them.
Twist each cutting off at a joint. Remove any buds. Lay the cuttings on dry paper towel for 24 to 48 hours.
Mix 60% peat or coir with 40% perlite or coarse sand. Moisten it until it feels like a wrung-out sponge.
Fill ten small pots and plant each cutting 0.5 to 1 cm deep.
Place them in bright indirect light at 70°F to 75°F. Keep humidity moderate, around 50% if possible, while avoiding wet leaves and soggy soil.
Wait without tugging.
When they root and begin growing, let them build strength. Around three months after rooting, pinch the terminal segment to encourage branching.
At about month four, if growth is steady, begin half-strength monthly feeding during active growth.
That’s how one tired holiday cactus becomes a row of new plants. Cut clean, dry first, plant shallow, keep warm, water carefully, and pinch later.
Go count the segments
Go look at the plant now.
Find one long, healthy stem and count the segments. If you can make one 3-segment cutting, you can learn the method. If you can make ten, you’ve got holiday gifts sitting on your windowsill already.
Twist at the joint, let it dry for two days, plant it shallow, and then leave it alone long enough to grow.


Leave a Reply