Most American gardeners plant zinnias in May, forget about them, get a handful of flowers in July, and then watch the whole bed turn into a tall floppy mess by August. Every year. Same story.
It's not the weather. It's not the variety. It's not the soil.
It's a handful of small things that almost nobody does in June, the month that actually decides what kind of zinnia season you'll have. Do those things and your bed will look like the cottage gardens you see on Instagram. Skip them and you'll get the same disappointing result every year.
The thing nobody tells you about zinnias is that they respond more to what you do in June than to anything else you do all year. Get the June routine right, and the rest of the summer is gravy. Get it wrong, and you're stuck with the result.
This guide walks through the exact routine that turns a sparse zinnia patch into a riot of color from July through October. It covers what to do, when to do it, and just as importantly, why each step works at a biological level. There's also a section on the varieties to grow for different goals, the tools that actually help, the mistakes that ruin zinnia beds every summer, and answers to the most common questions home gardeners ask.
Why June Is The Make-Or-Break Month
If you've ever wondered why your zinnias never quite measure up to the photos you see online, the answer is almost certainly in here. The good news is that fixing it is genuinely easy. The work takes maybe 15 minutes a week. The payoff lasts three months.
Zinnias are warm-season annuals. They go in the ground after the last frost, which means late April for the South, May for most of the Midwest and Mid-Atlantic, and early June for cooler northern zones. By the time June arrives, they're either out of their seedling phase or just emerging from it, depending on where you live.
This is the critical window. The 4 to 8 weeks of June and early July are when your zinnia plant decides what kind of season it's going to have.
If you treat it right during this window, the plant will branch out into a wide, bushy, multi-stemmed plant that produces flowers from now until your first frost. Three months of bloom from a $3 seed packet.
If you treat it the same way you'd treat a tomato or a sunflower (which is to say, leave it alone and let it grow tall), it will grow tall. Then it will put one flower on top of each tall stem. Then it will get leggy and floppy by August. Then it will quit. One disappointing month of bloom for the same $3.
The plant is essentially programmed to make one decision early in its life: grow up, or grow out. That decision happens within the first few weeks of true leaf growth. Once it's made, it's almost impossible to reverse. Which is why June, the window when the decision is being made, matters more than May (when the plant is just a seedling) or July (when the decision has already been locked in).
A Quick Note On US Climate Variation
Before getting into the routine, a brief geographical reality check. The United States is enormous and "June" means radically different things depending on where you live.
In the Deep South (zones 9 and 10), June is essentially mid-summer. Zinnias planted in April are already mature and beginning their main bloom phase. The work in June is more about maintenance than establishment.
In zones 7 and 8 (mid-Atlantic, much of the South and Southwest, parts of California, southern Texas, Pacific Northwest valleys), June is the active growing phase. Plants are establishing rapidly and the routine described below applies most directly.
In zones 5 and 6 (most of the Midwest, Northeast, Mountain West), June is when zinnias really kick into gear after a cool spring. The routine is essential and the window is tight.
In zones 3 and 4 (Upper Midwest, far Northern Plains, parts of New England, Alaska), zinnias may have only just been planted out in early June. The routine still applies but the timing shifts later by 2 to 3 weeks.
The principles below are universal. The exact dates shift based on where you live. References to "early June" assume zones 5 through 7, which covers most of the US population.
Step 1: Pinch The Tops Out
This is the single most impactful zinnia trick in this entire guide, and ninety-nine percent of home gardeners have never heard of it. If you only do one thing on this list, do this one.
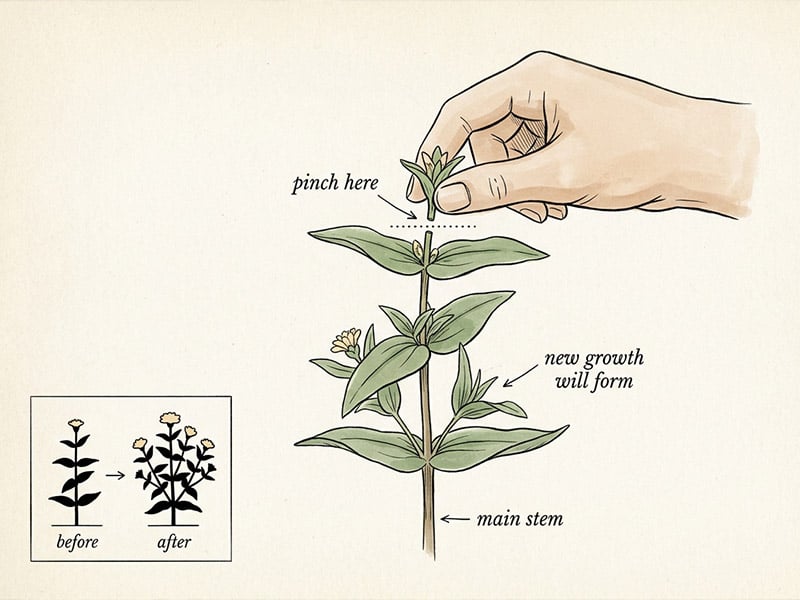
When a zinnia plant is about 8 to 12 inches tall (typically 4 to 6 sets of true leaves, depending on the variety), take a clean pair of scissors or pruning snips and cut off the top 3 to 4 inches of the main stem. Cut right above a set of leaves. Yes, this removes what would have been the plant's first flower. Yes, it feels deeply wrong. Do it anyway.
What happens next is genuinely magical. The plant, suddenly missing its main growth point, responds by sending out side shoots from every set of leaves below where you cut. Within two weeks, you've turned a single-stemmed plant into a 3-stemmed, 4-stemmed, or even 6-stemmed plant. Each one of those side stems will produce flowers. Then those side stems will branch again as you keep cutting flowers off.
A pinched zinnia plant will produce somewhere between three and five times as many flowers as an unpinched one. That number isn't an exaggeration. Commercial flower farmers do this religiously because the math is so obviously in their favor.
The only catch is that you have to do it early, before the plant has committed to its first flower. If you wait until you can see a real bud forming at the top of the plant, you've lost the window. The plant will still respond to pinching, but it will take longer to recover and you'll lose some of the benefit.
If you planted out in May, June is your pinching window. If you planted later, pinch the moment the plant hits 8 to 12 inches. The whole job takes about ten seconds per plant. It's the highest return on investment you'll ever get in your flower garden.
The science
Why pinching actually works
The top growing tip of any plant produces a hormone called auxin. Auxin's main job is to suppress the growth of the side buds further down the stem, keeping the plant focused on growing upward rather than outward. This is called apical dominance, and it's why most plants left to their own devices grow tall and lanky rather than bushy.
When you pinch out the growing tip, you remove the source of that auxin. Almost immediately, the suppressed buds at every leaf node below the cut wake up and start growing into new side stems. The plant goes from one growing point to four, six, or eight. Each new stem produces its own flowers, and each can be pinched again later for even more branching.
It's not a trick. It's just biology. You're removing the signal that was telling the plant to stay tall and skinny.
Step 2: Deadhead Religiously From The First Bloom Onward
Zinnias have one job in life, and it isn't to make you happy. It's to produce seeds. Once a flower has been pollinated and starts forming seeds in the center, the plant gets a hormonal signal that says "great, we did it, we can wind down now."
If you let zinnias go to seed, the plant will stop producing new flowers within a couple of weeks. The whole point of all those colorful blooms (from the plant's perspective) is to attract pollinators so it can make seed and ensure the next generation. Once that's accomplished, there's no biological reason to keep flowering.
The fix is to stop the plant from ever finishing its job. Deadhead every flower as soon as it starts looking faded. Don't just snap off the dead head. Trace the stem down to the next set of leaves below, and cut there. Pruning back to a leaf node both removes the spent flower AND encourages a new branch to form from that node.
This sounds like a lot of work. It isn't. Once your zinnias are established and pinched, you can deadhead a whole 4 by 8 foot bed in about ten minutes. Once a week is enough during slow weeks. Twice a week when they're cranking out flowers in July and August.
The flip side of deadheading is that you can deadhead by cutting flowers to bring inside. Every zinnia stem you cut for a vase is one you don't have to deadhead later. A weekly bouquet doubles as plant maintenance. Best deal in gardening.
The science
Why Deadheading Works
Flowering is expensive for a plant. The whole point of all those colorful blooms isn't to make the gardener happy. It's to attract pollinators so the plant can make seeds and ensure the next generation. Producing seeds takes an enormous amount of energy, which is why most flowering annuals are programmed to slow down once the job is done.
When a zinnia flower finishes blooming and starts forming seeds in the center, the plant releases hormones (mainly ethylene and abscisic acid) that signal "mission accomplished" to the rest of the plant. Growth slows. Flower production tapers off. Resources shift from making new blooms to ripening the seeds that already exist.
Deadheading interrupts that signal. By removing the spent flower before any seeds mature, you trick the plant into thinking it hasn't reproduced yet. The hormones don't fire, the wind-down doesn't start, and the plant keeps producing flowers in its endless effort to finally make a seed.
This is also why letting just one or two flowers go to seed at the end of the season is fine. The plant gets its signal, winds down naturally, and you get a few seeds to save for next year.
Step 3: Feed Them, But Feed Them The Right Thing
This is where most well-meaning gardeners get it wrong. The instinct is to throw a balanced fertilizer at any plant that looks tired. Or worse, to use a lawn-style nitrogen fertilizer because that's what's in the shed. Don't.
High-nitrogen fertilizer makes zinnias grow lots of dark green leaves and very few flowers. Beautiful, lush, useless plants. If your zinnias are tall, dense, and leafy but stingy with blooms, you've probably been over-feeding them with nitrogen. The fix is to stop, switch to something else, and wait it out.
What zinnias actually want is a fertilizer that's lower in nitrogen and higher in phosphorus and potassium. The NPK ratio you're looking for is something like 5-10-10, or 3-10-3, or any "bloom booster" or "flower" formula. These give the plant the building blocks for flowers and root development without pushing it toward leafy growth.
If you'd rather use a liquid feed, a diluted fish emulsion or a half-strength tomato fertilizer every two weeks does the same job. Just make sure you're not using anything labeled for lawns or leafy greens, because those are the high-nitrogen formulas.
Apply the feed once in early June, then again at the start of July. After that, the plants generally have what they need to coast to frost. Resist the urge to keep feeding them every two weeks. More food doesn't equal more flowers past a certain point, and you'll just push the plant back toward leafy growth.
The science
Why Fertilizing Works
The three numbers on every fertilizer bag (the NPK ratio) tell you the relative amounts of nitrogen, phosphorus, and potassium inside. Each one does a specific job in the plant, and feeding the wrong one in excess is how most gardeners accidentally sabotage their zinnias.
Nitrogen is the leaf-and-stem nutrient. Plants use it to build chlorophyll, the green pigment in leaves, and the structural proteins in new shoots. Give a plant lots of nitrogen and it responds by producing lots of lush green growth. That's exactly what you want for a lawn or a leafy vegetable. It's exactly what you don't want for a flowering plant, because all that energy goes into foliage instead of blooms.
Phosphorus is the flower-and-root nutrient. It's essential for the production of ATP (the molecule that powers almost every reaction in the plant) and for the development of flower buds, fruit, and the root system that supports them. A zinnia with adequate phosphorus produces more flower buds, ripens them faster, and grows the strong root system needed to support all that blooming.
Potassium is the regulator. It manages water movement, drought tolerance, and overall plant health, including the strength of the stems that hold the flowers up. A potassium-fed zinnia stands tall and resists disease.
A fertilizer with a low-nitrogen, high-phosphorus, high-potassium ratio (something like 5-10-10 or 3-10-3) gives the plant exactly the building blocks it needs for flowering without pushing it toward more leaves. It's not about feeding the plant more. It's about feeding it the right things.
Step 4: Water Deeply, At The Base, Not Too Often
The biggest watering mistake people make with zinnias is the same mistake people make with tomatoes: shallow, frequent watering from overhead.
A daily light sprinkle from a hose makes the gardener feel responsible. It does almost nothing for the plant. Light watering keeps the surface of the soil moist (which encourages roots to stay near the surface), wets the leaves (which invites powdery mildew, the curse of zinnia growers everywhere), and doesn't actually penetrate down to where the real roots are working.
What you want instead is to water the bed deeply, less often. Once or twice a week, depending on your climate and weather, give the bed a long, slow soaking. The goal is to wet the soil down to at least 6 inches, which trains the roots to grow deep and find their own water during dry spells.
Water at the base of the plants, not over the foliage. A soaker hose is brilliant for this if you have one. If you don't, a watering can with the rose taken off, applied directly to the soil at the base of each plant, works fine.
Morning is the best time. Watering in the morning lets the soil absorb the water before the heat of the day evaporates it, and any moisture that does end up on the leaves dries off before evening. Evening watering leaves wet leaves overnight, which is exactly when fungal diseases get to work.
Mulch the bed too, while you're at it. A 2 to 3 inch layer of straw, shredded leaves, or fine bark mulch around (but not against) the base of each plant will hold moisture in the soil and dramatically reduce how often you need to water. It also keeps the soil cooler in July and August heat, which zinnias quietly appreciate.
The science: Why deep, infrequent watering works
Plant roots grow in the direction of available water. When you water lightly every day, the only water available to the roots is in the top inch of soil. The plant responds by building a shallow, surface-level root system that depends on you to water it constantly.
When you water deeply once or twice a week, water penetrates 6 inches or more into the soil. The plant's roots follow that moisture downward, building a deep root system that's much better at finding water on its own, surviving drought, and accessing nutrients from a larger volume of soil.
There's a second mechanism worth knowing. Deep watering also encourages the development of root hairs (the tiny fine roots that do most of the water and nutrient absorption). Root hairs are produced most heavily at the moisture front, the edge between wet and dry soil. Shallow watering keeps that front in the top inch all the time, producing a thin layer of root hairs. Deep watering creates multiple moisture fronts at different depths as water moves through, producing root hairs throughout the entire root zone.
The result is a plant that's significantly more drought-tolerant, more productive, and less dependent on you for daily maintenance. It's also a plant that's less susceptible to fungal disease, because the foliage stays dry between waterings and the soil surface doesn't stay perpetually moist.
Step 5: Watch For Powdery Mildew And Act Early
Powdery mildew is the one disease that will absolutely turn up on your zinnias somewhere between July and September. It's not a question of if. It's a question of how bad and how early.
The white dusty coating starts on the older lower leaves, then spreads upward and outward across the plant. By the time it's everywhere, you've lost a meaningful portion of the season.
The science: Why mildew loves zinnias
Powdery mildew is caused by a group of fungi (the Erysiphales) that specialize in colonizing the upper surfaces of leaves. Unlike most fungi, powdery mildew doesn't need wet conditions to thrive. It actually prefers humid air around the leaves combined with dry leaf surfaces, which is exactly what happens when zinnias are densely planted, watered at the base, and surrounded by other plants.
The fungal spores land on a leaf, germinate, and send tiny feeding structures into the leaf cells. The white "powder" you see is the fungal mycelium spreading across the leaf surface, with thousands of new spores forming at the surface, ready to be carried to nearby leaves by even the lightest breeze.
The reason zinnias are so vulnerable is genetic. Zinnia leaves have a thin cuticle (the waxy protective layer) compared to most flowering plants, and they're packed with the sugars that powdery mildew fungi feed on. The plants are essentially walking buffets for the fungus.
Once mildew is established on a leaf, it can't be reversed. The leaf is colonized for good and will eventually yellow, dry up, and fall off. Prevention and early control are the only practical strategies.
Practical prevention and control
The June and early July prevention is straightforward. Give your zinnias good air circulation by not crowding them too closely (12 to 18 inches apart is right for most varieties). Water at the base, not the foliage. Prune off the bottom few leaves of each plant once they're established so that air can move around the base of the stems. Don't deadhead in damp weather if you can avoid it (wet stems plus shears can spread fungal spores).
If you start seeing the first white spots in early July, you can usually keep it from spreading by removing the affected leaves immediately and disposing of them (not in the compost). The leaves should go into the trash or a hot compost pile that reaches at least 140°F, which is hotter than most home compost piles get.
For more advanced cases, a weekly spray of diluted milk (1 part milk to 9 parts water) or a baking soda solution (1 tablespoon per gallon of water plus a drop of dish soap) genuinely works to suppress the spread. Both work by changing the pH of the leaf surface to something the fungus can't tolerate. The milk also contains proteins that activate when exposed to sunlight, creating an antifungal effect. Neither is a miracle cure but they slow things down enough to get you to frost.
If you're growing for cut flowers and you live somewhere humid, look for the Profusion or Zahara series of zinnias. They're bred specifically for mildew resistance and they perform noticeably better in the Southeast and Mid-Atlantic. The traditional Benary's Giant and State Fair series are gorgeous as cut flowers but more vulnerable to mildew, so they reward a more vigilant maintenance routine.
Step 6: Succession Sow For Flowers Into October
This one's optional, but it's the difference between "amazing zinnia year" and "best zinnia year of my life."
Most gardeners plant their zinnia bed once in May and call it done. The plants flower from July onward, peak in August, and start to look tired by mid-September. If you want bloom that carries you right through to your first frost (and even later, in warmer zones), succession sow.
Direct sow a second batch of zinnia seeds in early to mid June. They'll come up within a week in warm soil, grow fast, and start flowering by early August, just as your May-planted zinnias are starting to wind down. The result is a continuous wave of fresh flowering plants rather than one peak that fades.
If you're really ambitious, sow a third round in early July. Those plants will hit their stride in September and keep going until frost. In Zone 7 and warmer, that can mean zinnias on the kitchen table into late October.
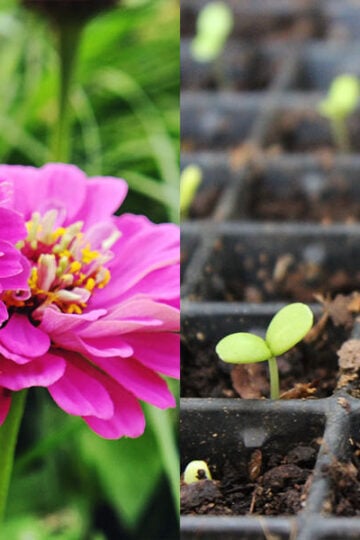
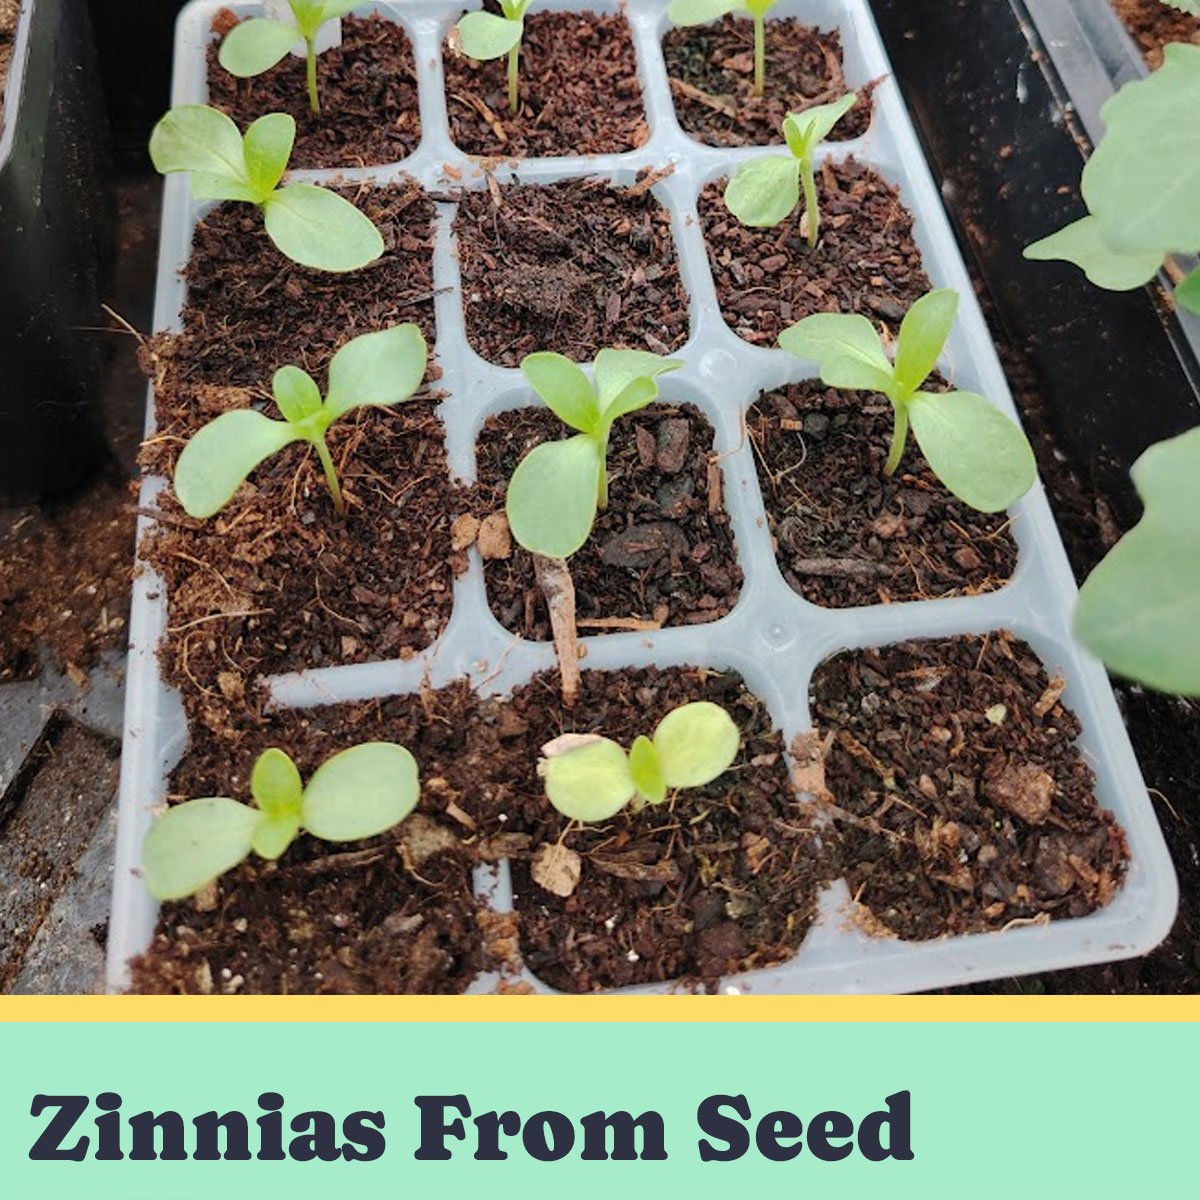
Each new round needs about 4 weeks from seed to first bloom in warm soil, and zinnias direct-sow with very high success rates. You don't need to start them indoors. Just scatter the seeds, cover lightly with a quarter inch of soil, water, and walk away. They'll do the rest.
The other benefit of succession sowing is disease management. By the time your first round of zinnias starts showing mildew or other late-season problems, your second and third rounds are stepping up to take over. The bed never goes through that depressing late-August slump that single-planting beds always hit.
The Best Zinnia Varieties For American Gardens
There are dozens of zinnia varieties available in the US, and the right one for you depends on what you want from your bed. Here's a practical guide to the varieties worth knowing.
For cutting gardens and the most spectacular blooms. Benary's Giant series is the gold standard. Tall (up to 4 feet), large blooms (4 to 6 inches across), and incredible color range. Specific colors worth seeking out: 'Benary's Giant Wine' (deep burgundy), 'Benary's Giant Lime' (chartreuse green), 'Benary's Giant Carmine Rose,' and 'Benary's Giant White.' These are the varieties commercial cut flower growers use. They want full sun, regular feeding, and they reward pinching dramatically.
For mildew resistance in humid climates. The Profusion series and the Zahara series are both bred specifically for resistance to powdery mildew and leaf spot. They're shorter than Benary's Giants (12 to 18 inches tall), more compact, and produce smaller flowers but in massive quantities. 'Profusion Cherry,' 'Profusion Apricot,' and 'Zahara Starlight Rose' are particularly striking. Essential picks for the Southeast, Mid-Atlantic, Gulf Coast, and anywhere humid.
For containers and smaller spaces. 'Thumbelina' (6 to 8 inches tall, miniature blooms), 'Magellan' series (compact with double flowers), and the Profusion series mentioned above all work brilliantly in pots and balcony gardens.
For the classic cottage garden look. 'California Giants' produce huge double flowers in the traditional zinnia color range (red, pink, yellow, orange, white). Tall (3 to 4 feet), classic, and forgiving of average care. 'State Fair Mix' is similar and is one of the most widely available varieties in American garden centers.
For something unusual. 'Persian Carpet' is a small bi-colored heirloom variety with dark mahogany red flowers tipped in gold. 'Envy' is a chartreuse green double that looks like nothing else in the garden. 'Queen Lime Red' is a sophisticated bi-color with a soft pink and lime green palette popular with flower designers. 'Aztec Sunset' is a smaller variety with rich orange and red bi-colors.
For pollinators specifically. 'Will Rogers' (heritage variety, single petals with open centers easy for bees to access), 'Cactus Flower Mix' (open quill-shaped petals, exceptional for butterflies), and any single-petal zinnia variety will outperform doubles for pollinator attraction. The fancier double varieties look stunning but they're harder for pollinators to feed from.
Companion Plants For Your Zinnia Bed
A zinnia bed doesn't have to be just zinnias. Several companion plants make the whole bed perform better while filling out the visual space.
Marigolds. Particularly French marigolds (Tagetes patula). Their roots release compounds that suppress soil nematodes, and their strong scent confuses some pests. They also bloom in colors that complement most zinnia palettes. 'Lemon Gem' and 'Tangerine Gem' are signet marigolds that grow as low mats around the base of zinnias.
Cosmos. Light, airy texture that contrasts beautifully with the dense blooms of zinnias. Both flower at the same time, both attract pollinators, both are easy from seed. 'Sensation Mix' and 'Cosmic Orange' are reliable varieties.
Salvia. Tall purple-blue salvia spikes are the perfect color counterpoint to hot-colored zinnias. 'Victoria Blue' is a classic, as is 'Black and Blue.' These also bring in hummingbirds, which won't visit zinnias themselves but will work the salvia and pollinate the whole bed in passing.
Basil. Especially the ornamental varieties like 'Purple Ruffles' or 'Cinnamon.' Basil keeps aphids and other pests away from zinnias while giving you something useful for the kitchen.
Snapdragons. Spring snapdragons that are tired by midsummer can be cut back to make room for zinnias. Or plant fall snapdragons that take over visually as the zinnias begin winding down in September.
Verbena bonariensis. Tall, see-through, lavender-purple flower clusters on long bare stems that float above the zinnia canopy. Pollinator magnet, drought tolerant, and looks like a designer planted it on purpose.
Avoid. Don't plant zinnias near sunflowers (they shade out the zinnias and compete for water), and avoid putting them next to plants prone to powdery mildew (cucumbers, summer squash, monarda) because mildew spreads readily between species.
Tools You Need (Honestly Not Many)
Zinnia maintenance requires almost no equipment. The basics:
A good pair of sharp scissors or small pruning snips. For pinching tops, deadheading, and harvesting flowers. The Fiskars Micro-Tip Pruning Snips are perfect for this work. So are any small bypass pruners. Keep them clean and sharp.
A watering can with a removable rose. Take the rose off to water at the base. Put it back on for gentler watering of seedlings. A simple metal or plastic can works fine.
A soaker hose or drip irrigation (optional but excellent). For a 4 by 8 foot zinnia bed, a single 25-foot soaker hose connected to a hose timer makes the entire watering routine automatic.
Garden gloves. Useful for deadheading because zinnia stems are slightly sticky and the lower leaves can be scratchy on bare arms during long sessions.
A small bucket or basket. For collecting deadheaded flowers, spent leaves, and trimmings. Don't drop them on the ground around the plants because they can harbor mildew spores.
A spray bottle for milk or baking soda solution. Only if you're treating mildew. Otherwise not needed.
That's the entire toolkit. No specialized equipment, no expensive gadgets, no electric anything.
The Most Common Zinnia Mistakes (And How To Avoid Them)
A handful of mistakes account for most of the disappointment people experience with zinnias. Knowing them in advance saves you a season of frustration.
Planting in too much shade. Zinnias need 6 to 8 hours of direct sun per day, minimum. Anything less and they'll be leggy, sparse, and prone to mildew. If your only available spot gets less sun than this, choose a different flower (cosmos handle shade better, or impatiens for serious shade).
Sowing too thickly and not thinning. Zinnia seeds germinate at high rates, and gardeners often end up with seedlings crammed together. Crowded zinnias produce nothing. Thin to 12 to 18 inches between plants once they're up. Use scissors to snip the unwanted seedlings at soil level rather than pulling them.
Watering from overhead daily. Already covered, but worth repeating. This is the single most common cause of "my zinnias don't bloom well." Switch to deep, infrequent base watering and you'll see a difference within two weeks.
Skipping the pinch. The most impactful step in the whole routine and the one most people don't believe in until they try it. The plant looks worse for about 7 days after pinching, then dramatically better forever after.
Using lawn fertilizer or high-nitrogen feed. Already covered. Read the NPK numbers on the bag before you sprinkle anything around your zinnias.
Planting out before the soil is warm enough. Zinnias don't tolerate cold. Soil temperature should be at least 65°F before you plant out, which is typically 2 weeks after your average last frost date. Earlier transplants sit and sulk and sometimes never recover.
Not deadheading. The plant goes to seed and shuts down. By the time you notice, you've lost weeks of bloom.
Leaving mildew until it's everywhere. The window to do something about powdery mildew is the first 2 to 3 days after you see the first white spots. Wait longer and the bed is essentially done.
Composting diseased material. Mildew spores survive home compost. Bag affected leaves and put them in the trash.
Not succession sowing. Single-planting beds always hit a late-August slump. Succession sowing every 3 to 4 weeks keeps the bed in continuous bloom.
What The Routine Actually Looks Like In Practice
You don't need to overthink this. Once you've done it for one season, it becomes part of how you walk past the bed.
Early June: Pinch the tops of every plant. Apply a low-nitrogen granular fertilizer or first liquid feed. Mulch the bed.
Mid June: Direct sow a second round if you want continuous bloom. Start watching for any signs of mildew, especially on the lower leaves.
Late June onward: Deadhead weekly. Water deeply once or twice a week, at the base, in the morning. Take cut flowers indoors freely (the plant will reward you with more). Watch for mildew and act early if you see it.
Early July: Second feed. Pinch the tops of any second-round seedlings when they hit 8 to 12 inches.
Throughout July and August: Continue weekly deadheading. Treat any mildew as it appears. Cut bouquets for the kitchen.
September: Last feed of the season if you're in a long-season zone. Otherwise, just keep deadheading. Watch for the first sign of frost in cooler zones and harvest any flowers you want to preserve.
That's the whole routine. Five things, none of them difficult, all of them happening in a one-month window. It's not glamorous. It's not a secret. It's just the difference between the left side of every zinnia photo on the internet and the right side.
Frequently Asked Questions
How long do zinnias bloom?
A single zinnia plant will bloom from about 60 days after sowing until first frost, which is typically 90 to 120 days of continuous bloom for most American gardeners. With succession sowing, the bed itself can bloom continuously from July through October.
Will zinnias come back next year?
No. Zinnias are annuals and die at first frost. However, they readily self-sow if you let one or two flowers go to seed at the end of the season. The volunteer seedlings that come up next spring may not be true to the parent variety (especially if you grew hybrids), but they'll still be zinnias and they'll still bloom.
Do I need to start zinnia seeds indoors?
No, and you shouldn't unless you have a very short growing season. Zinnias germinate quickly in warm soil (5 to 7 days at 70°F) and resent root disturbance from transplanting. Direct sowing produces stronger plants in almost every case. Only start indoors if you're in zone 3 or 4 and need to get a head start.
Can I grow zinnias in pots?
Yes, and they're brilliant container plants if you choose the right variety. Compact varieties like Profusion, Zahara, Magellan, or Thumbelina work best. Use a pot at least 12 inches deep with drainage holes. Water more often than ground-planted zinnias because containers dry out faster.
Why are my zinnia stems flopping over?
Three common causes. First, too much nitrogen, causing weak stems with poor structural strength. Second, not enough sun, causing the plant to stretch upward looking for light. Third, no pinching, leading to a single tall stem that can't support its own flower weight. Fix the cause and the problem resolves itself by the next round of growth.
Should I save seeds from my zinnias?
Yes if you grew open-pollinated varieties (like California Giant, State Fair Mix, or any heirloom). No if you grew F1 hybrids (Benary's Giant, Profusion, Zahara), because the seeds won't come true to the parent variety. Let one or two flowers fully dry on the plant in late September, then snip the dried flower head, rub the seeds out, and store them in a paper envelope in a cool dry place.
Do deer eat zinnias?
Generally no. Zinnias are not on the preferred deer browse list, though hungry deer will eat almost anything. If you have heavy deer pressure, plant marigolds or other strongly aromatic companions around the zinnia bed as a deterrent.
Can I grow zinnias as a cut flower farm crop?
Absolutely. Zinnias are one of the easiest and most profitable cut flowers for small-scale growers. The Benary's Giant series in particular are bred for cutting and have stem lengths up to 3 feet. Pinch aggressively, feed appropriately, harvest every other day during peak bloom, and condition the cut stems by placing them immediately in clean water with a drop of bleach to prevent stem rot.
My zinnias have green centers turning fuzzy. What's wrong?
That's likely "aster yellows," a viral disease transmitted by leafhoppers. The centers of the flowers grow strange leafy structures instead of normal disc florets. There's no cure. Remove and bag any affected plants to prevent spread to others.
Do hummingbirds visit zinnias?
Not usually. Hummingbirds prefer tubular flowers like salvia, bee balm, or trumpet vine. Zinnias attract butterflies, bees, and hoverflies, but rarely hummingbirds. To bring hummingbirds into the zinnia bed, plant some salvia or bee balm nearby.
Final Thoughts
If you've been doing all of this already and you're still getting the leggy, sad version, the likeliest culprits are too much nitrogen (check what fertilizer you've actually been using, including any general-purpose feeds you might have added "just in case"), or not enough sun (zinnias need 6 to 8 hours minimum; anything less and they'll always be a bit underwhelming).
But for most gardeners, the routine above is genuinely all it takes. One pinch in June, a low-nitrogen feed at the right moment, regular deadheading, deep watering at the base. Two months from now, you'll be the one your neighbors stop and ask about.
And if anyone asks for the secret? You can tell them it's just June. Just paying attention in June.
Leave a Reply