Yes! Lupins can be easily grown from the pods left behind after their vibrant flower display. Read on to find out the best way to grow your lupins from seed pods and a few helpful tips and tricks.
One important thing to mention here is that lupins don't grow true to seed. What this means is that the plants grown from seed won't be the same as the plant the seed came from.
With lupins, this means different coloured flowers from the parent plant, although this is not guaranteed it does happen.
So if you have a rarer colour of lupin and want to keep that colour going then you are better off taking cutting or splitting an existing plant than growing another from seed.
If you want to grow some new lupins from the seed pods then keep reading!
How To Grow Lupins From The seed Pods
Follow the steps below and you too will be able to enjoy free lupins grown from your own seed pods.
Wait until the seeds begin to brown
The first step to growing lupins from the seed pods is the harvesting of the pod.
You want to select a few of the spikes that you intend to leave to go to seed while the plant is still actively growing, I normally choose one of the bigger ones and deadhead all of the others.
The seed pods will be green at first, do not harvest them while they are green, this is too early. You want to leave the spike with the seed pods on the plant until they turn brown.

Leave in a cool dry spot
Now move the full spike with the pods into a dry spot, a shed is a perfect place for this. You want to leave the pods plenty of time to dry out.
They will begin to dry and crack, the seeds will then pop out on their own.
I like to put them in these old coffee cans as they are nice and dry, a paper envelope can work well too.


Wait until spring
Now that you have your own homegrown seeds you want to wait until spring before you start germinating them.
Stratifying the seeds
Stratifying seeds is essentially cold shocking them, and is essential to growing certain seeds. Lupins do well after being stratified, this can be easily done by putting them in the freezer over winter.
An even easier method is to plant your lupin seeds in soil over winter, they will then be naturally stratified.
Lupins will also self-seed sometimes in the garden, if you want to learn more about that find my dedicated article here.

Growing lupins from seed
Soak the seeds
Soak your lupin seeds in water the night before you intend to plant them, this will aid in the germination process.
Sow in seed trays
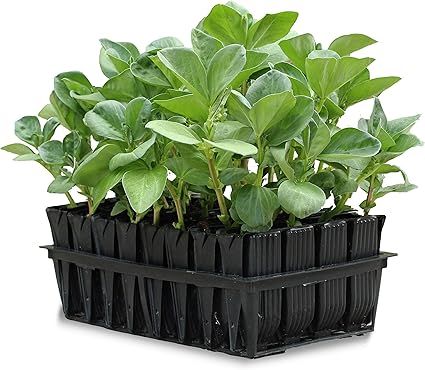
I always like to sow lupins in seed trays, a root trainer like the one below works the best as you can take the plant out without damaging the roots.
You can use any multi-purpose compost and begin sowing in middle to late February depending on the weather. Sow in a greenhouse or on a window sill if sowing in early spring.
If sowing later in the year you can try sowing directly to the ground although I have never used this method. One easy way of sowing lupins is to sow directly into the soil in the autumn or winter for growth next year.
Lupins are self-seeders so this is essentially mimicking their natural cycle and they normally do quite well when grown like this.
Plant out
When the seedlings have begun to establish themselves you can start to think about planting them out. Established can mean different things though depending on your location, the weather and also pest level in your garden.
Slugs love munching on lupin seedlings, you can plant out a full border of young lupins and find them gone by the next morning.
So if you seem to be in a never-ending war with slugs in your garden I would advise potting the young lupins on and keeping them in a greenhouse until they are more established.
With this method though you don't want the lupin to grow too "leggy". This is when they grow tall and dangly due to the conditions in the greenhouse.
This can happen when a plant is started really early, essentially the plant has the warmth it needs to get growing but not necessarily the right amount of light at this time of year.
This forces the plant to grow tall and long, searching for more light. It is why seedlings started on windowsills can also grow really leggy.
Leave them out of the greenhouse during the day bringing them in at night to avoid this.
The colder temperatures will tell the plant to calm down a little on the growth, but we will still be protecting it over those really cold nights.

Caring for lupins
Lupins are well adapted to the UK climate and grow well in most soils, so there isn't too much you need to do to care for them.
There is a good reason lupins are now considered an invasive species in New Zealand! There are a few simple steps to take however to achieve the best display for the entire summer.
Deadhead
Deadheading lupins is essential to getting flowers for the entire summer. When you deadhead any plant including lupins then the plant usually creates more flowers.
Like all living creatures plants have a built-in desire to reproduce, lupins do this through their flowers turning to seed.
If you deadhead the flowers before they turn to seed then the plant will put its energy into producing fresh flowers and therefore seed so it can reproduce.
Cutback in autumn
When autumn comes around and your lupins have finished their annual display it is time to cut them back.
While this may seem like a drastic step, particularly the first time around, they will come back stronger and thank you for this display of tough love.
You can cut them right back to the base in autumn, they will store their energy in the roots and come back bigger than ever next spring.
You can also allow this to happen naturally, the foliage on the plants will die back when the first frosts arrive.
If you do this though you must remove the dead foliage and not just leave it over winter. If you leave the foliage right above the roots of the plants then it may introduce rot.
This is because there will be a damp, rotting, mess of leaves right above the root of the plant.
They will be working like a sponge and keeping the rootstock of the plant continuously wet, this is a good way to kill your lupin off for good!
Dividing your lupins
Lupins are a great plant to divide up. This can be done after a few years, it both gives you new plants and helps extend the life of the original plant. You don't need to be too careful with this, just split with a spade and replant.
Cheryl says
This is a great site with easy to follow instructions love it thank you .
Mrs M Gallagher says
Good for you. It is very well set and and very informative. Well done
Tracey says
Thankyou...this has been very helpful guidance. The format is easy to follow.
keith TUNSTALL says
Brilliant Daniel. Thank you very much for the thorough season to season instructions.
Keep em coming!
Keith
Odette Barnes says
The information and advice you give here is brilliant. It is exactly what I wanted to know and more besides. Clearly written in an engaging, personal style too.
Thank you so much.
Patrick mccarthy says
Yes, I thought this was very useful. I didn't know that I should stratify them so good to know. Thank you. Lupins seem to do well this year. Cold winter? Slow start for slugs and snails? First signs of ravaging only now.
Richard Wilkinson says
Thanks so much for the Lupin advice, cant wait to get started growing from seed pods. I'm always grateful to people who give their skills advice freely, thank you.
Richard
Arabella says
Brilliant! Step by step and easy to follow. I love my lupins, normally purchase from a GC but have a green house now and going to give it a go myself.
Happy gardening. Arabella
Wilma says
Thank you very clear information to follow great to know where to come for this .I love my garden and love trying out seedlings . Do you have advice on how Azalea I have a Beutiful white one and a large piece was broken off is there any way I can try to save it into o other plant
Daniel says
You could definitely take some cuttings from the broken part, but I doubt you would be able to save the whole thing. It will just take the plant too long to establish a strong enough root structure to support a lot of foliage.
Pauline says
Thank you for your advise. Looking forward to an array of lupins.
Liz H. says
Thanks so much for your simply put advice. Only a couple more stems to collect. Hopefully the family will be overflowing with lupins this time next year!!!
Elle says
Thank you Daniel. Excellent timely advice 🙂
Kathy Scott says
Thank you for clear advice and instructions as I am a complete novice!, I found your site a great help.
Thank you., I'll certainly call on you again, many thanks. Kathy
Malcolm Gates says
Excellent and thank you....
Jane says
Brilliant, seeing the Lupins in NZ is a must , need to try and grow them in my Scottish garden, very informative, thank you.
Jann says
Hi. I have a tree lupin - pale yellow with very vigorous growth over a fence and up into a tree. How do I propagate from it and I'd like to share this delight with some friends.
Daniel says
Hi Jann, I have never taken cuttings from a tree lupin before but I believe you do it in much the same way as a regular lupin. Take a Basal cutting right from the root of the plant when it is growing in spring.
Melanie Moriarty says
Thank you for this. Please can you share info about edible lupins? I’ve just germinated some from seed and planted out but it would be useful to know more about collecting the seeds and how to eat them!
Daniel says
I have never grow edible lupins, I believe you grow them in the same way as regular lupins, but im afraid I wont be much help!